Adding Source Control in Visual Studio
One of the most important things I wanted to set up was source control. If you're not familiar with the concept, source control (also called version control) is an approach to managing changes to your code. When you write code, you can use source control to do things like:
- Make sure that only one person at a time is working on a particular file.
- Resolve code conflicts between multiple developers who might have ended up working on the same files.
- Keep track of when changes were made to a project, and by whom.
- Roll back to previous versions of the code, if something breaks after you've made changes.
The main code base is stored in a location called a "repository." If you have a remote repository, such as an online location like a GitHub server, you can also use the repository as a way to back up your code, in case your hard drive fails or some other catastrophe strikes. I don't have a remote repository set up, but I wanted to at least be able to revert to previous versions of my code if I made a mistake and messed something up.
I used Git and other source control solutions (even older ones like SVN and CVS) on a lot of work I did in school and on professional teams, but even though I'm not working on a team now, and it's just me on the project, I still feel it's helpful to have source control.
Luckily Visual Studio has built-in support for Git source control (the most common source control system), so I was able to easily set up a repository and add my shared project to it.
A quick disclaimer, I already had Git installed on my computer. I believe that Visual Studio does give you the option to install Git as part of its installation process. I already had Git installed for a previous project, but in case you need to install it, you can get more information about how to do so for your specific system at https://git-scm.com/book/en/v2/Getting-Started-Installing-Git. You don't have to use Git, I believe Visual Studio allows other source control solutions as well. Even though I'm not currently using them, it's still not a bad idea to learn more about solutions such as CVS and SVN as well.
More About Git Terminology
There's some terms and concepts that are good to know if you're new to Git and source control, and I'd recommend some links that do a way better job of explaining it than I do. For starters, you might check out Dzone's article at https://dzone.com/articles/git-basic-terminologies-explained. There's lots of developers out there who do a way better job of getting into the depths of Git and source control than I do, so I will include references and resources throughout and at the end of this writeup.
Setting Up My Project for Git
I already had set up my MonoGame project before adding it to source control, and rather than deleting the repository and setting it up again, here's a demo of how to do it using an older solution I'd worked on.
First,
I opened my solution in Visual Studio, and then under the File menu,
I selected "Add to Source Control":
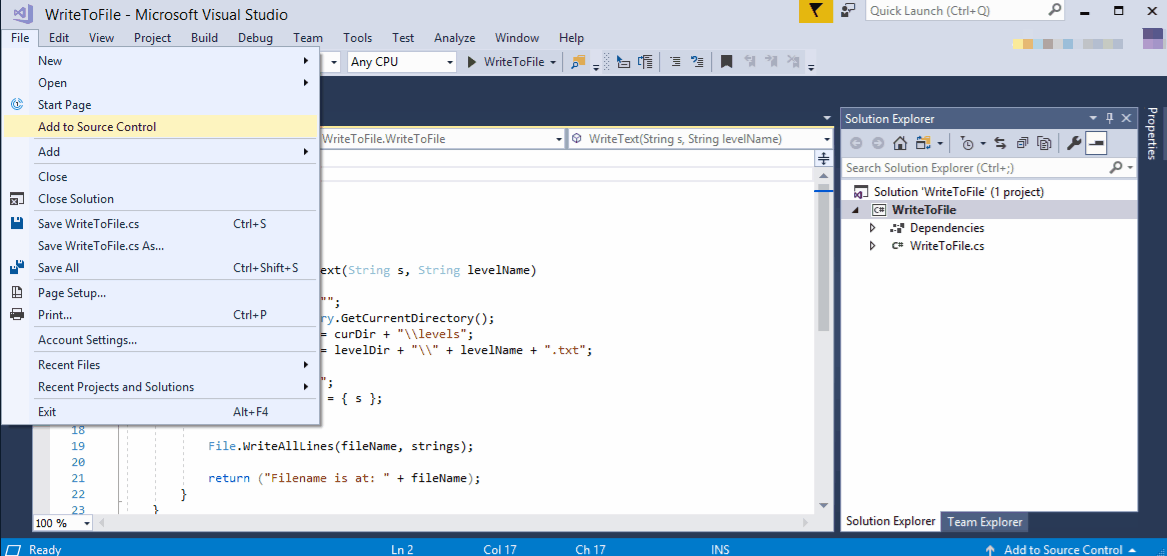
The project's name is WriteToFile. In the next step, I went to the "View"->"Team Explorer" option in the menu bar, as you can see below. Once I opened that view, you can see that under the "Local Git Repositories" section, there's two repositories listed: one for my
BrainBouncer project, and another for my WriteToFile project.
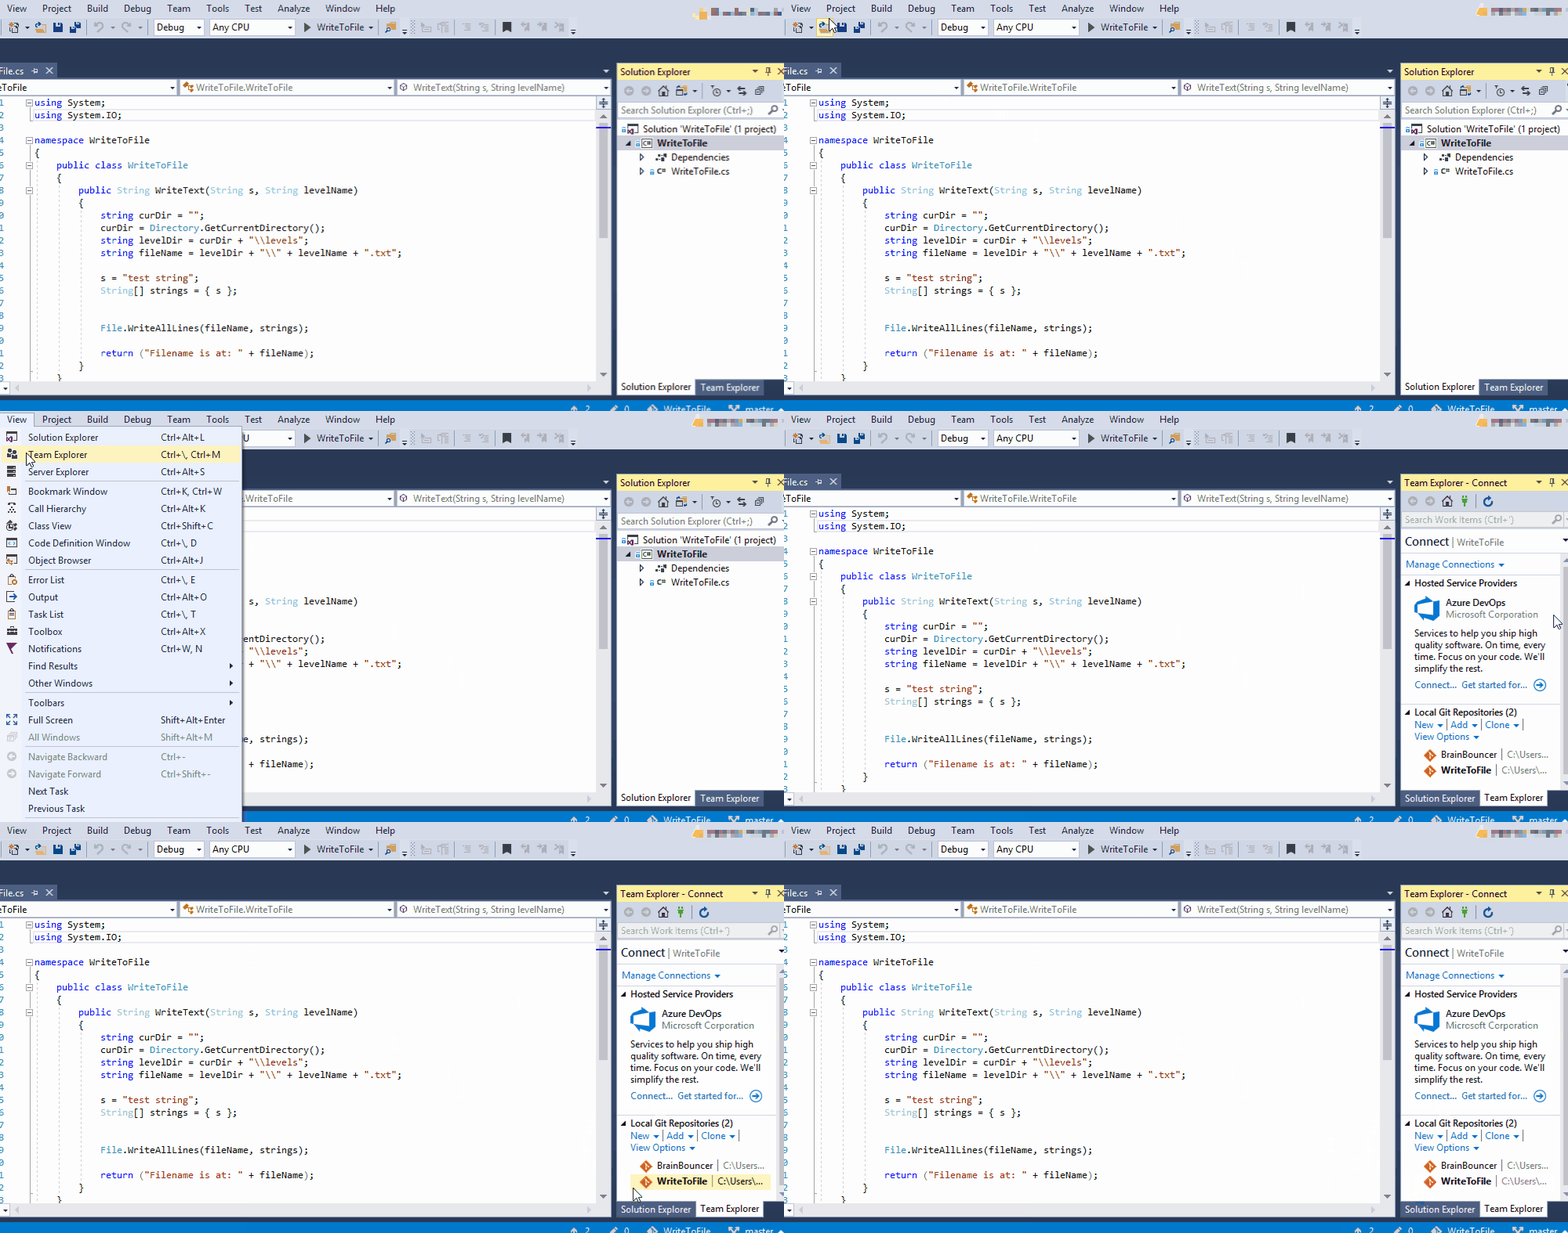
A nice feature is that when you create a repository this way, it is automatically set up in the solution directory where all your files are, so you don't have to try and navigate there for initial setup.
If you click on the repository, now you can get a view of what's in it. You'll see the solution (which in my case is WriteToFile.sln), as well as some options you can click on. You can also see an option called "Changes," and if you click on it, it shows you any changes that have been made to your project. Right now I haven't made any, so there's none to show. You can also use the browser arrow icon to move to a previous window, as you see me do in the following GIF.
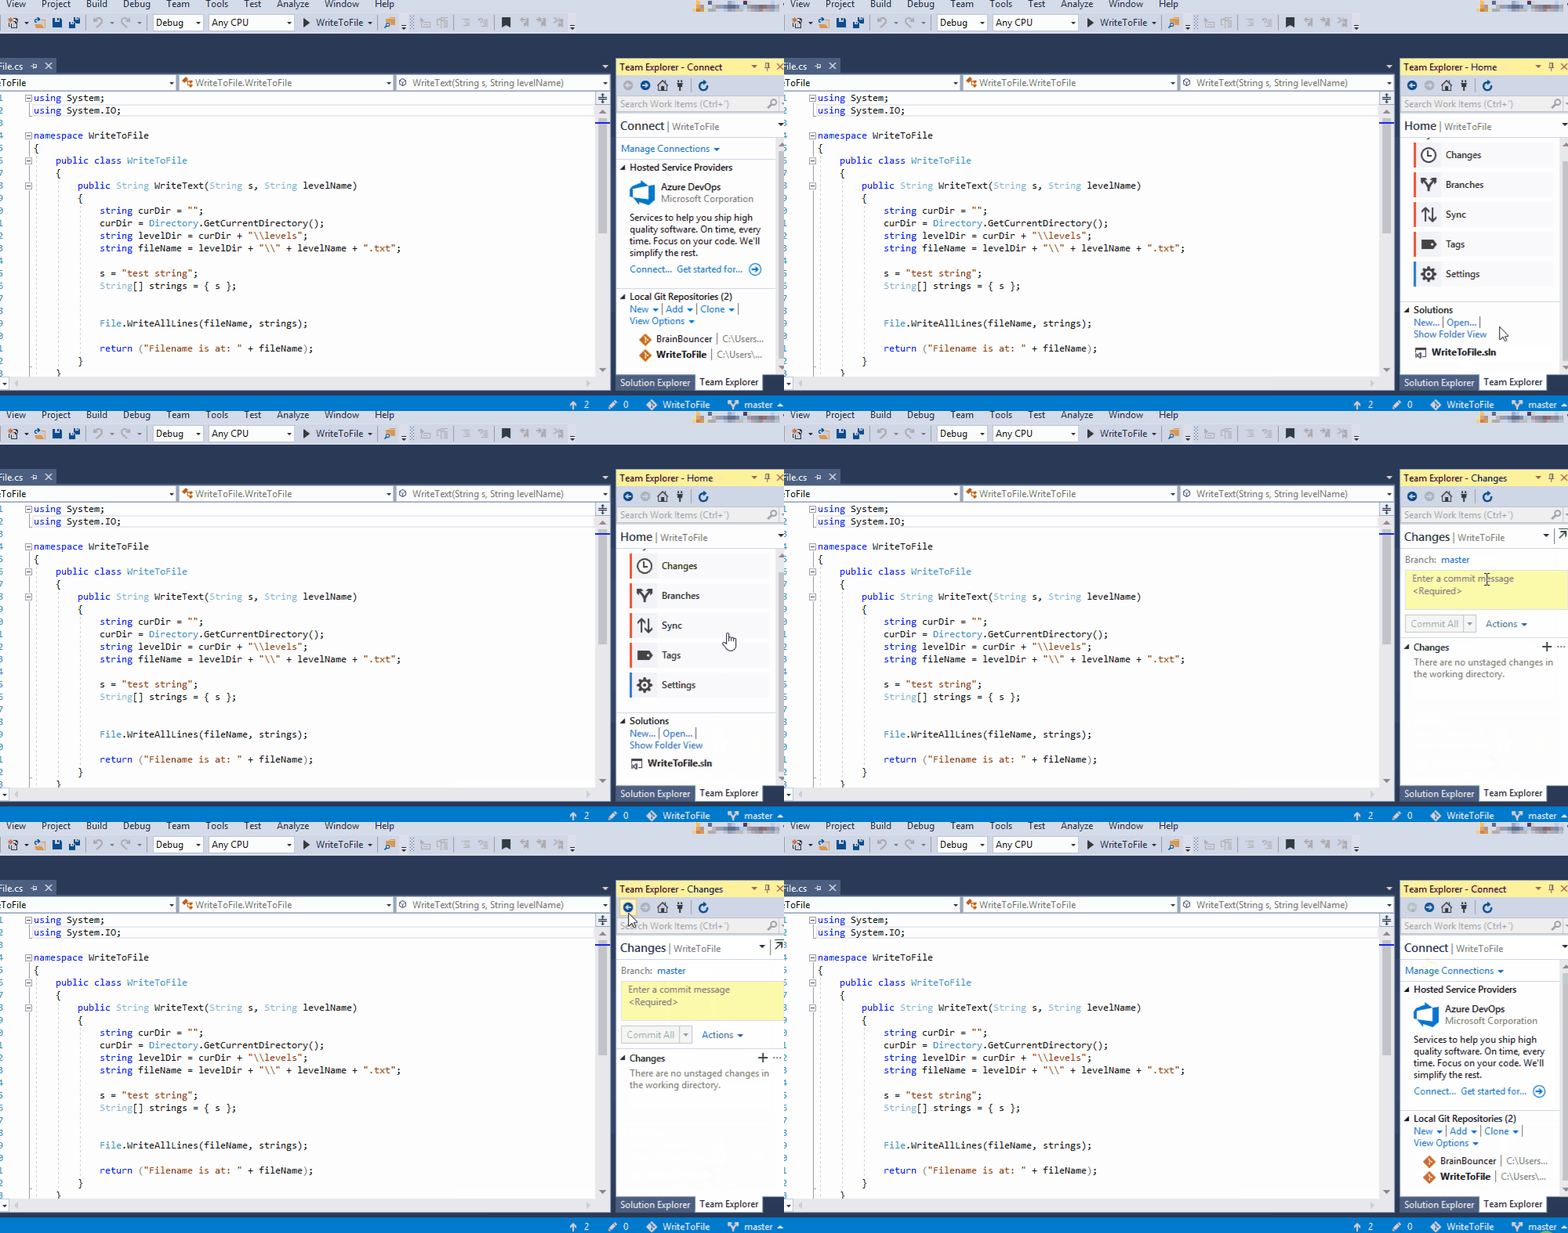
Making a Change
Ok, so let me show you how I can make a change and then commit it.
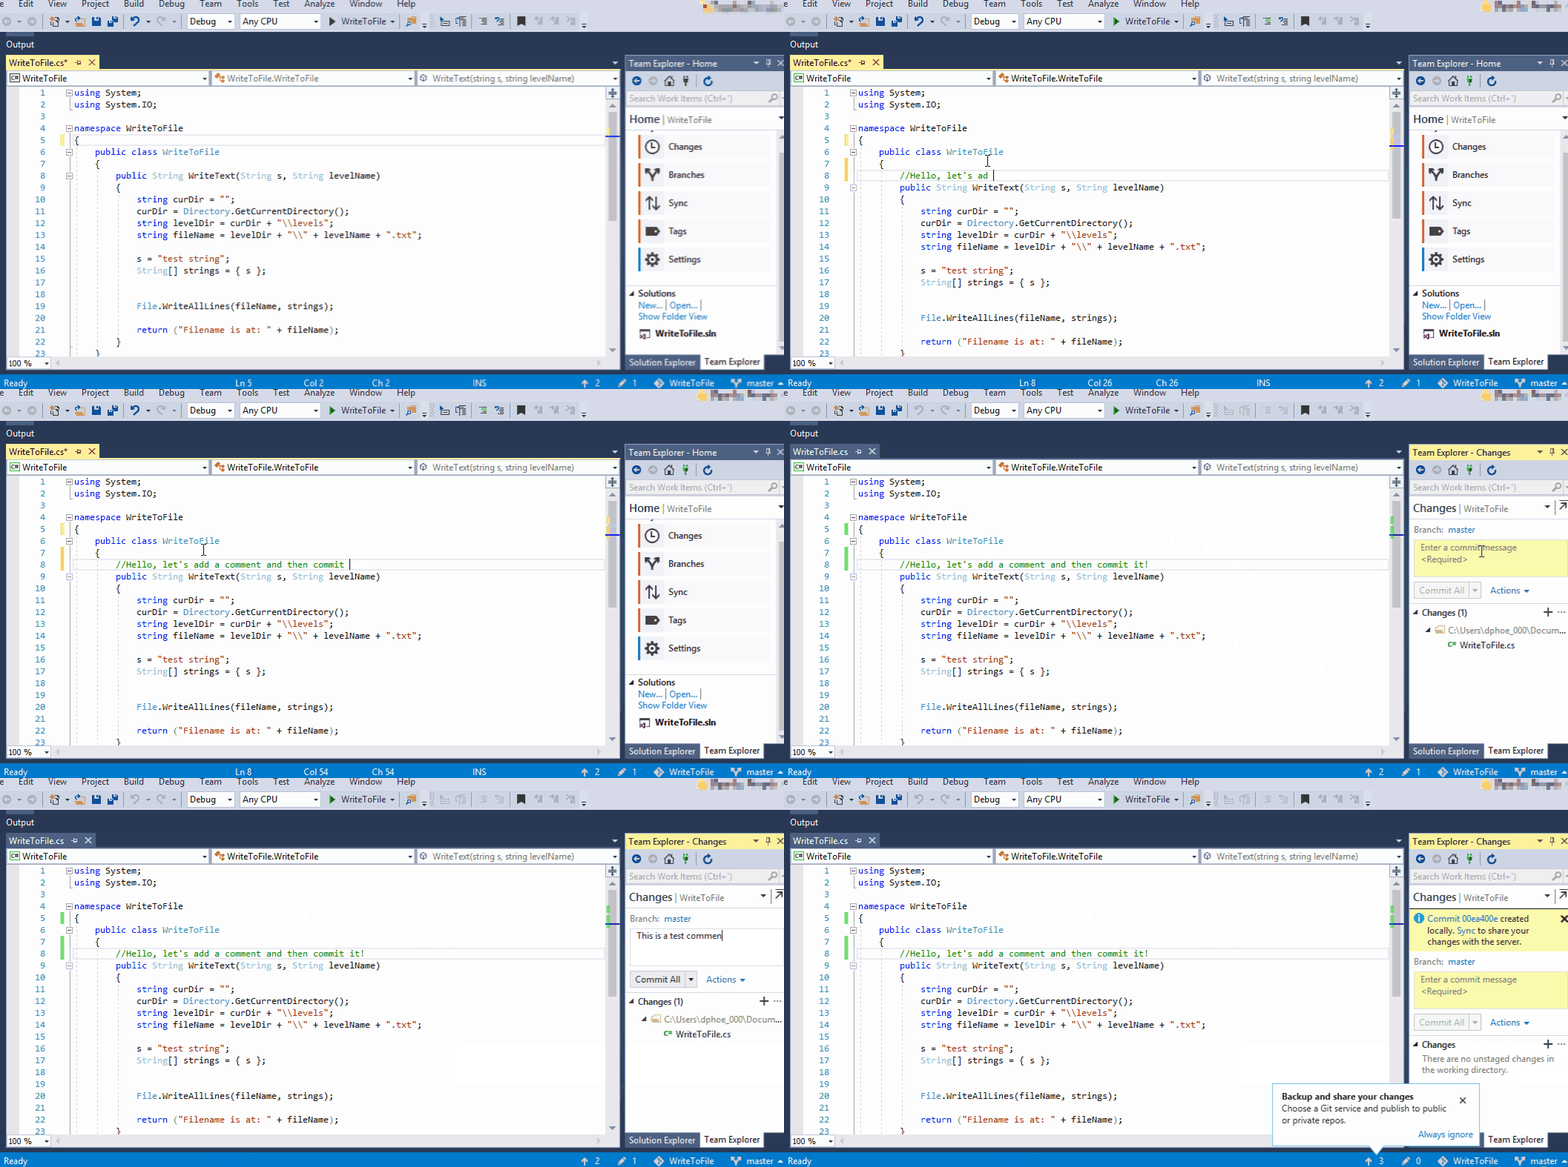
I added a comment, and then I saved. In the Team Explorer view, I clicked on Changes. You can see under the Changes section that I had one changed file listed, and then in the yellow box that says "Enter a commit message," I typed a short note, "This is a test commit.", about what I did. Then I selected Commit All. If you look at the Changes section again after that commit, you'll see that I have no more changes, and won't until I modify the project again.
Commit messages are very helpful. They can be like a "change log" that explains what you did and why. On your first time committing in Visual Studio, you'll be prompted to add a name and email address to your commit message. This feature is very handy if you're on a team, because then every commit message will tell you who made those changes.
Also note that changes don't just apply to modifying a file. If you add or remove any files from the project, that counts as a change, too.
Viewing Change History
Now that the project is in source control, I can also look at the repository history of changes. In the lower right corner of Visual Studio, there's a branching arrow icon that says "master" next to it (you can see this in the screenshot below). If you click on the "master" text, a menu will pop up, and if you click on the "View History" option, you'll see a window like what I have in the screenshot below.
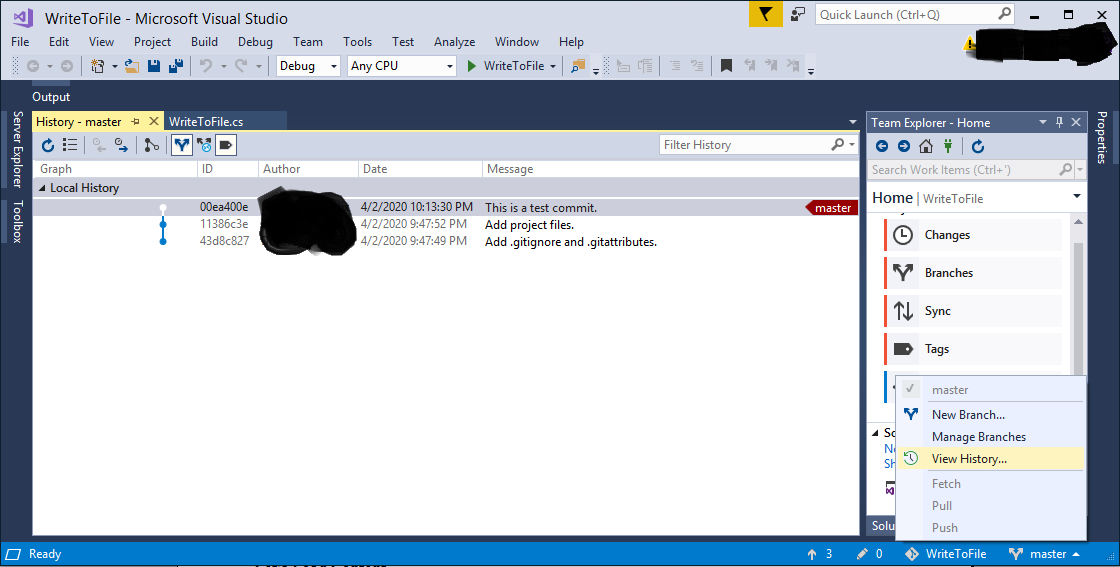
At the top of the list is the "This is a test commit." message I wrote, along with the date and time of the commit I made. The first two items in the list, with messages that say "Add project files" and "Add .gitignore and .gitattributes", were automatic commits that happened when I first added the project to the repository. If you want to know more about the files, here's some quick reading for you:
- gitattributes: https://git-scm.com/book/en/v2/Customizing-Git-Git-Attributes
- gitignore: https://git-scm.com/docs/gitignore
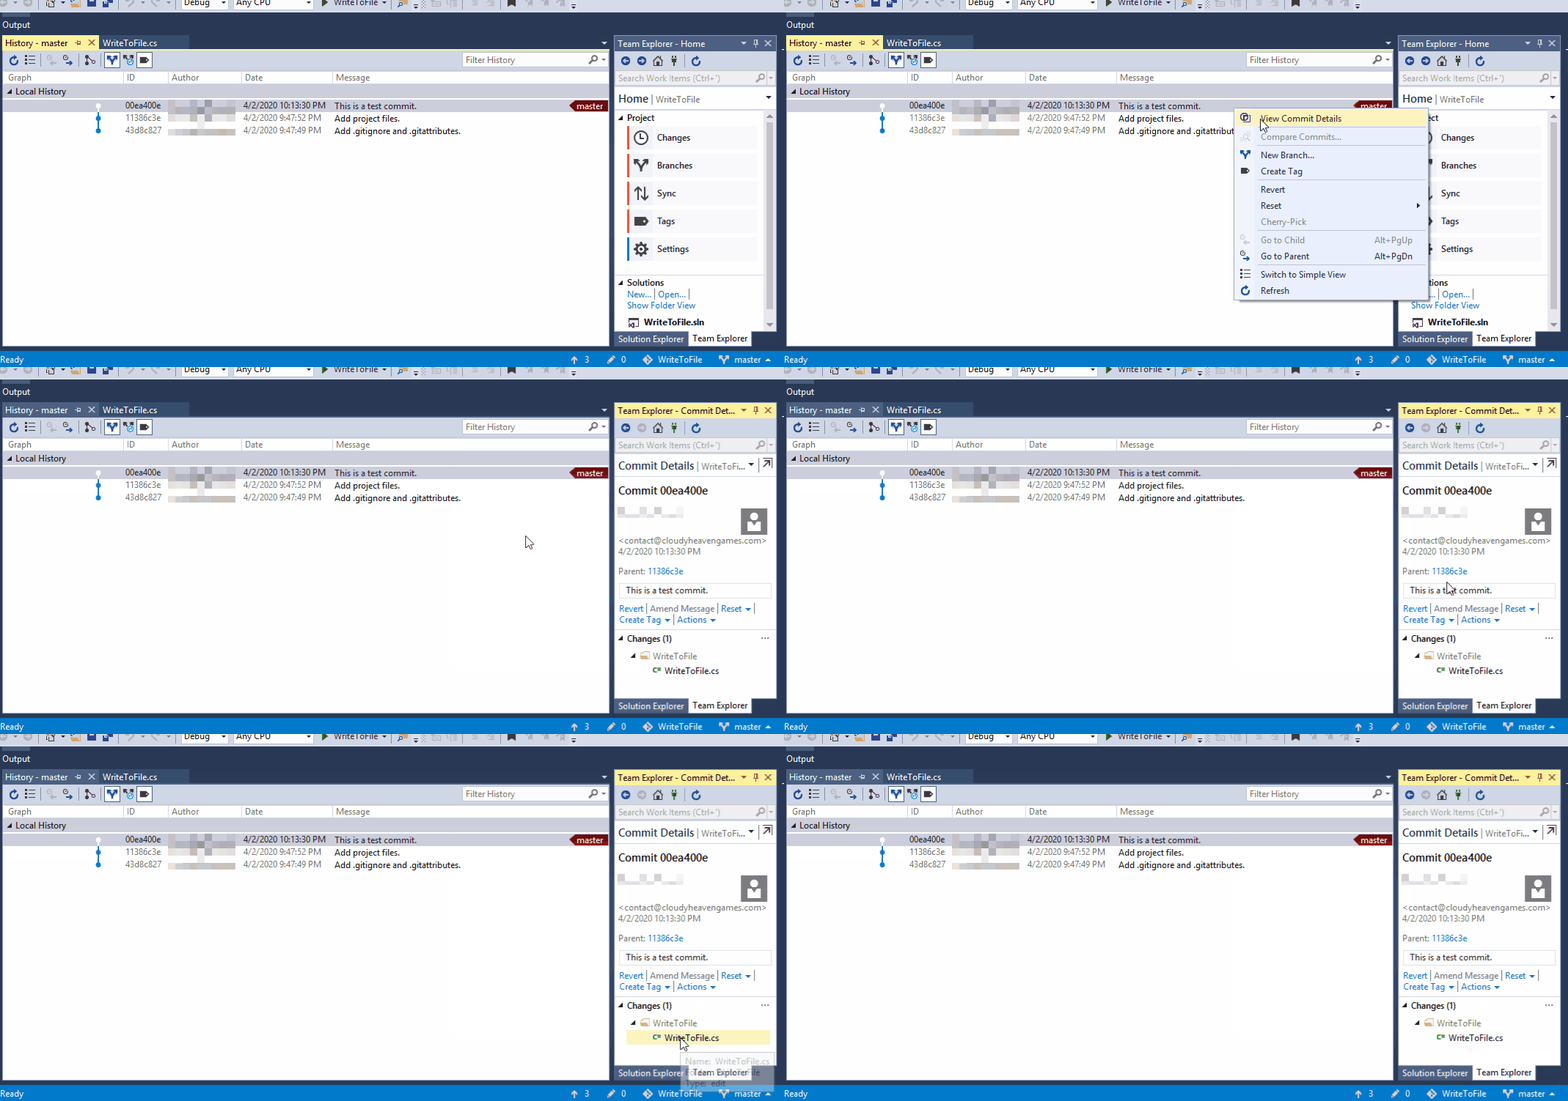
Going back to our project, if you right-click on any of the items in the commit list, and then click "View Commit Details" you can see a more detailed description of that commit, including the files that were changed. In the screenshot below I looked at my most recent commit, which correctly shows that I changed the WriteToFile.cs file.
Reverting a Change
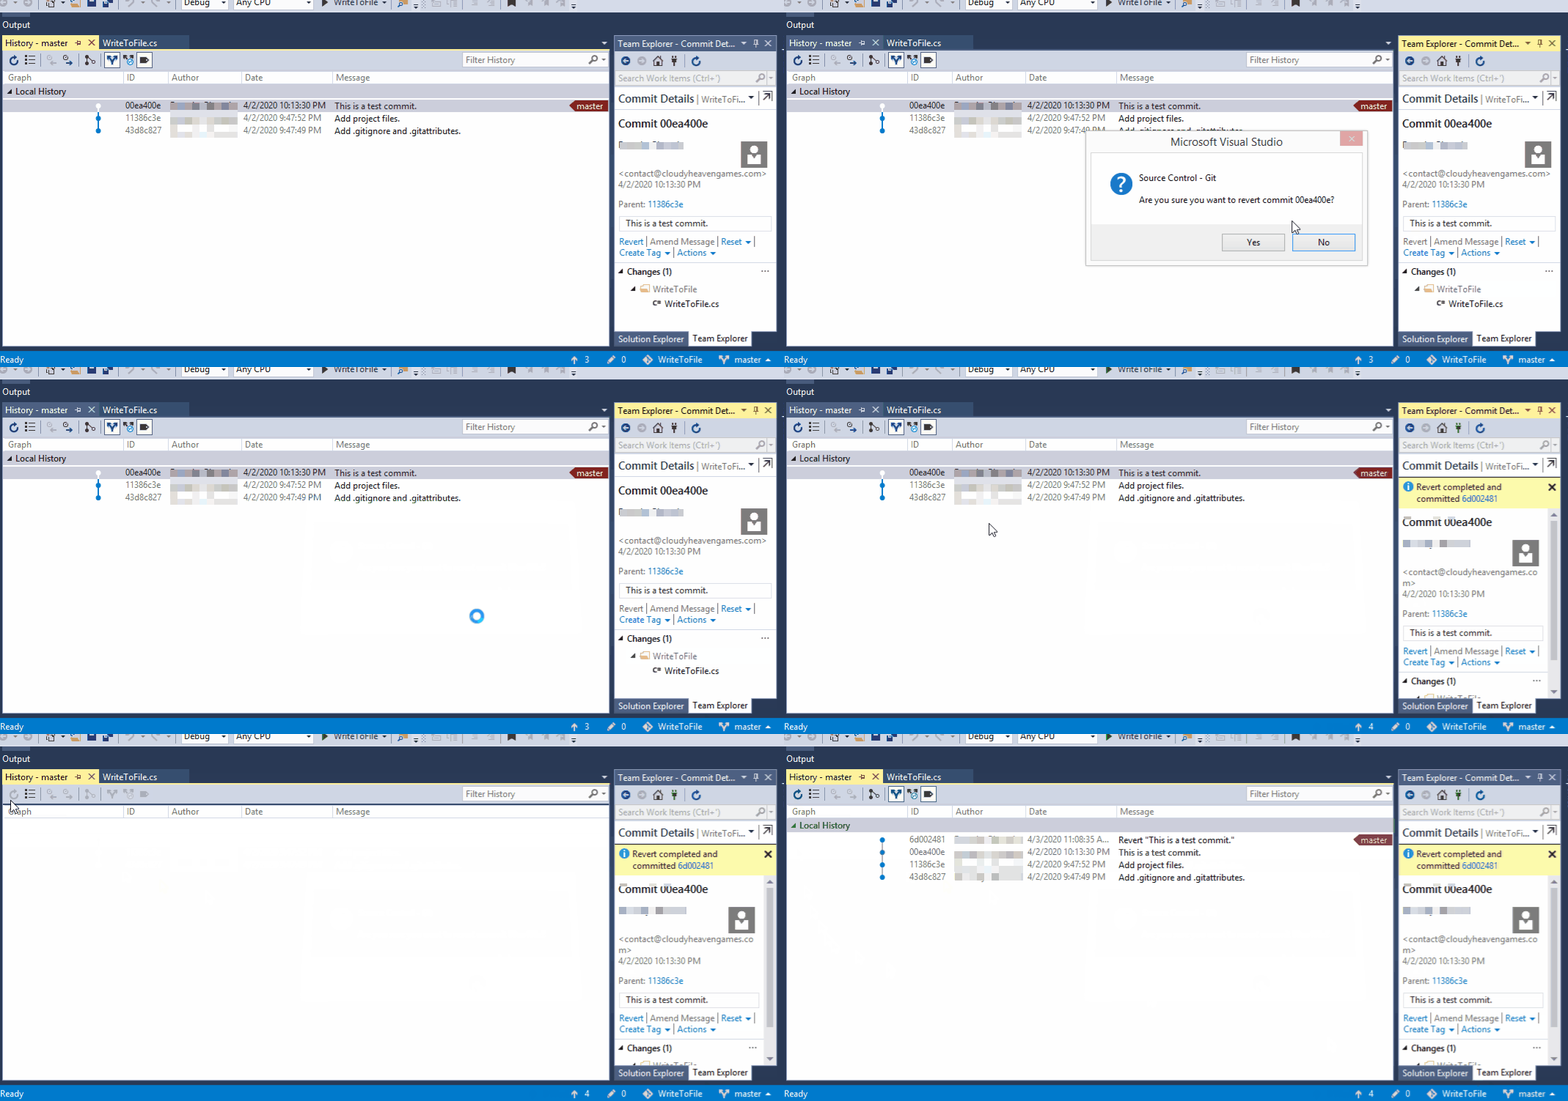
If I want to undo or roll back a change I made, I can click on "Revert" under the commit details, and then confirm that I want to go through with reverting. You can also revert by right-clicking on the commit in the "History" window and selecting "Revert" if you'd like. You can see below that once I confirmed the revert, after a few seconds, the "Commit Details" window shows a message that says "Revert completed and committed." I can then refresh the History window, and I see my reversion as a new item on the history list. Note that the commit I reverted is still listed in the History window, so if I decide that I want to keep that change I undid after all, I can always undo my revert, and reinstate my changes.
You might wonder why I didn't just go to the code file and click "Undo" to take back the changes I made. This example was small, but reverting rather than trying to manually undo individual changes has advantages:
- It's a lot faster, especially for when you've made lots of changes in one file, or when you've changed a lot of different files.
- The "Undo" stack in an editor doesn't retain all the changes that you've made, so if you decide you want to redo some changes, you might not be able to if you're not using source control.
- With source control you have a record of your reversions and other changes, which you don't get with "Redo" or "Undo."
So now, let's look back at my code file again after I reverted:
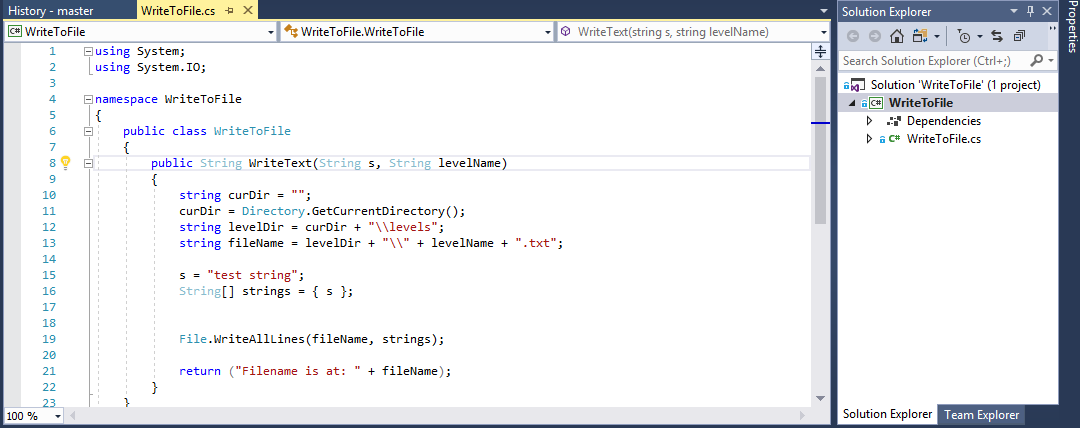
It's
back to it's original form! Again, I could have just manually erased
the comment or used "Undo," but think about what would have
happened if I had wanted to change many files back instead.
Summary
So, these are the basics of how I got my source control set up for my Brain Bouncer project. Again, note that these steps are only for a local repository on my computer, but if you're doing a project with a remote repository (on GitHub or some other solution), and if you're working with a team, there's other features and considerations you need to know about. I'll probably do another write-up once I get set up with a remote repository. Here's some helpful resources:
- https://git-scm.com/book/en/v2/Appendix-A%3A-Git-in-Other-Environments-Git-in-Visual-Studio
- https://git-scm.com/book/en/v2
- https://www.vogella.com/tutorials/GitHub/article.html
- https://www.codemag.com/Article/1411061/The-Simplest-Thing-Possible-Git-and-Visual-Studio
- https://channel9.msdn.com/Shows/Visual-Studio-Toolbox/Git-Fundamentals
- https://try.github.io/
- https://biz30.timedoctor.com/git-mecurial-and-cvs-comparison-of-svn-software/
If you're a new or less experienced developer and you'd like to start or advance a career in software development, I'd highly recommend getting familiar with source control solutions, and use them for some of your personal learning projects. It's a great skill set to have on your resume.
Get Brain Bouncer
Brain Bouncer
A bouncy puzzle game that will have you considering all angles.
| Status | In development |
| Author | cloudyheavengames |
| Genre | Puzzle |
| Tags | 2D, Physics |
| Languages | English |
More posts
- Saving the Level Data and Reloading from a FileNov 16, 2020
- Using Maps/Dictionaries to Score Game Level ScoresNov 07, 2020
- Converting and Loading Levels from GameMaker Studio with JSONOct 23, 2020
- Adding and Organizing Content in MonoGameApr 11, 2020
- Getting Started with the MonoGame Project: Setting Up a Shared ProjectMar 29, 2020
- Migrating from GameMaker Studio to MonoGameSep 17, 2019
- New features, and available on Google Play!Nov 23, 2017
Leave a comment
Log in with itch.io to leave a comment.