Getting Started with the MonoGame Project: Setting Up a Shared Project
I mentioned last fall that I would be migrating Brain Bouncer to MonoGame, and that I would be posting updates on my process. I know I haven't been good about updating, so I have a lot of catching up to do. In this post, I will start walking you through what I've done so far, so that if you want to know how to do something similar in MonoGame, I can hopefully be of some help to you.
First off, I am using an older laptop running Windows 8.1, and am running MonoGame using Visual Studio 2017. So, if you're using a different setup, you might notice some differences.
I've already made progress in the project, so in the screenshots I share, you'll see that I've already started the coding and the project file structure.
Screen Captures
I've found a very useful free tool that I used to create the GIF screenshots for this tutorial. It's called ScreenToGif, which you can find at https://www.screentogif.com/. As an independent developer myself, I thought it might be useful for other game devs or tech people.
Setting Up a Shared Project
Note: After posting on the MonoGame official forums, a helpful user named Apostolique pointed me to another tutorial on a cleaner way to set up a shared project, which you can read at https://github.com/harry-cpp/MonoGame/blob/newprojdocs/Documentation/setting_up_project/setting_up_project.md. Note that you will need to use your system's command line interface to follow these steps (so on my Windows system, I would use cmd.exe).
This game is multi-platform, so we'll be using a shared project, so that we can have a common code base for both Windows, Android, and any future platforms. A shared project allows you to create one common code base that can be used for different platforms, and then you can create additional projects that are specific to each platform. These additional projects will have a reference to the shared project. This approach saves you time and effort, because instead of duplicating the same base code for each platform, you can write it once and then reuse as needed.
I read
about shared projects in this tutorial:
https://devblogs.microsoft.com/xamarin/build-your-first-game-with-monogame-getting-started/. I'd highly recommend working through it if you are new to MonoGame. I will be referencing it throughout this write-up, so you might want to read through it before reading the rest of this post. Unfortunately, the version of MonoGame/VS 2017 that I have does not
have the MonoGame Shared Library template that the tutorial mentioned available, so I created a
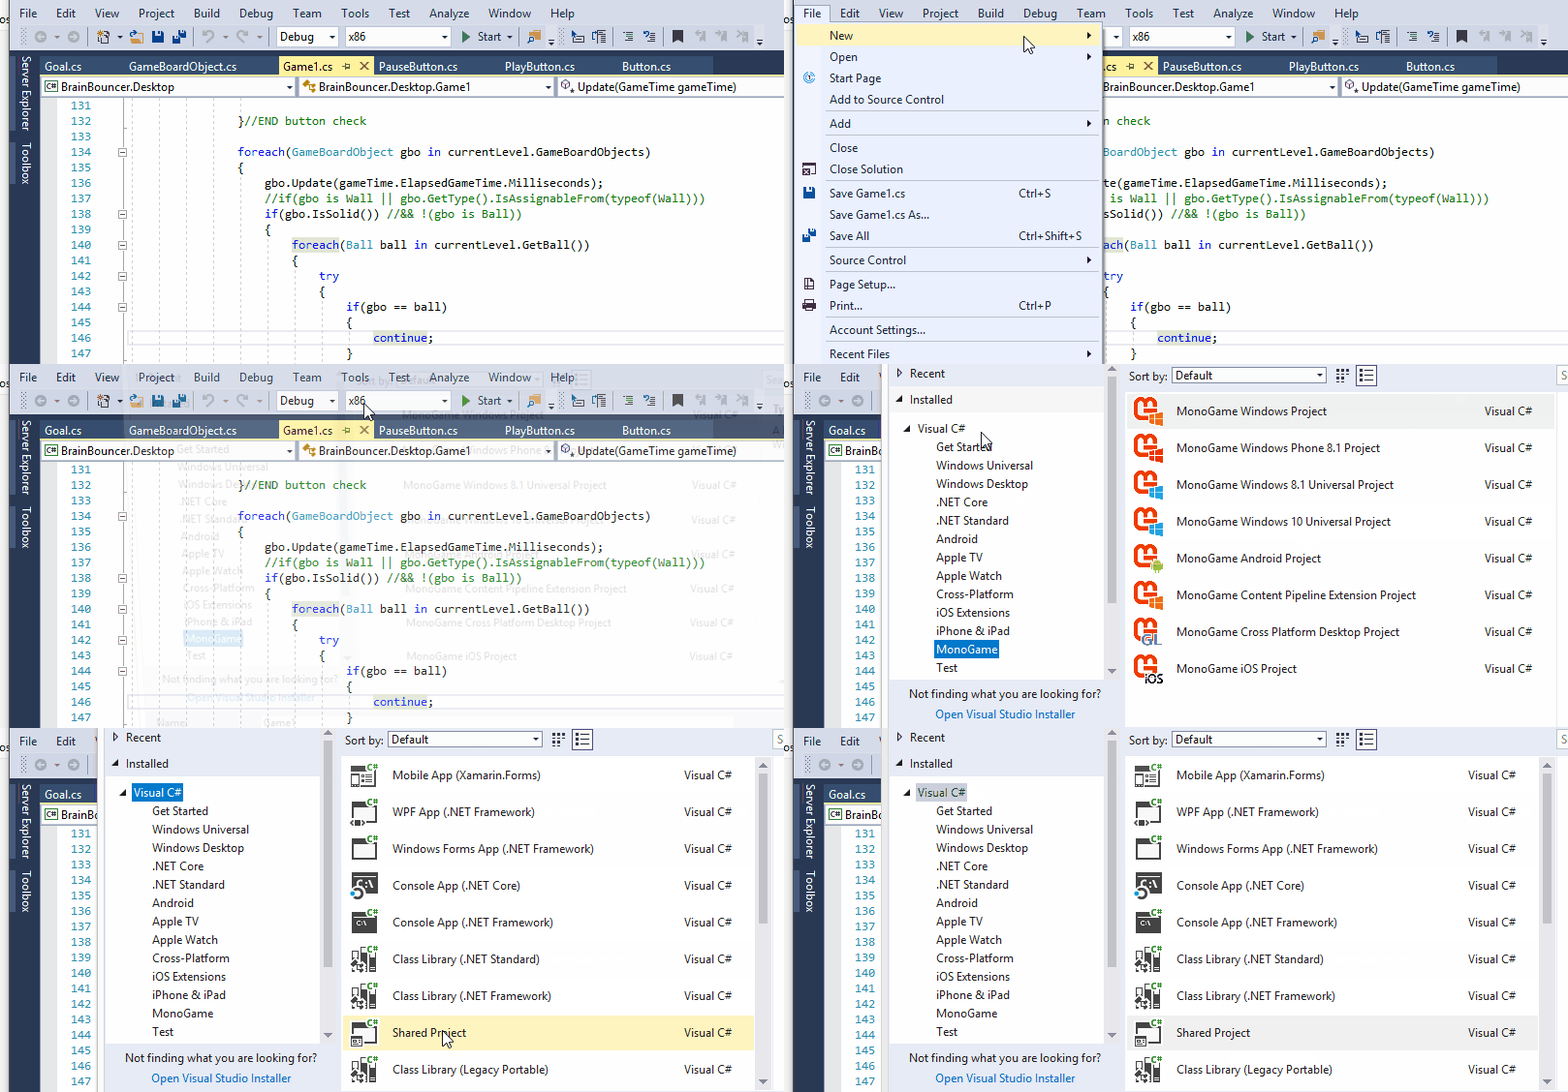
C# shared library instead. If you're following the tutorial I linked, the steps it tells you to do are: "choose File -> New Solution -> MonoGame -> Library -> MonoGame Shared Library and name the project MonkeyTap." Instead, I did these steps: File -> New -> Project -> Shared Project, as seen in the GIF below.
There's some work to be done to add the
MonoGame functionality to this plain C# library.
I then followed the tutorial's steps of adding a platform-specific project. I decided to start with the Windows target, so I added a MonoGame Cross Platform Desktop Project to my solution, and named it BrainBouncer.Desktop. I don't have any other desktop platform computer other than Windows right now, but this approach might be helpful if I decide to branch out to Mac or Linux. The tutorial says to add a “MonoGame for Android Application”, but I decided I want to do most of my testing on the desktop first. To find the option to add a new project, right-click on the solution under the Solution Explorer in Visual Studio. You can see how I did that step below:
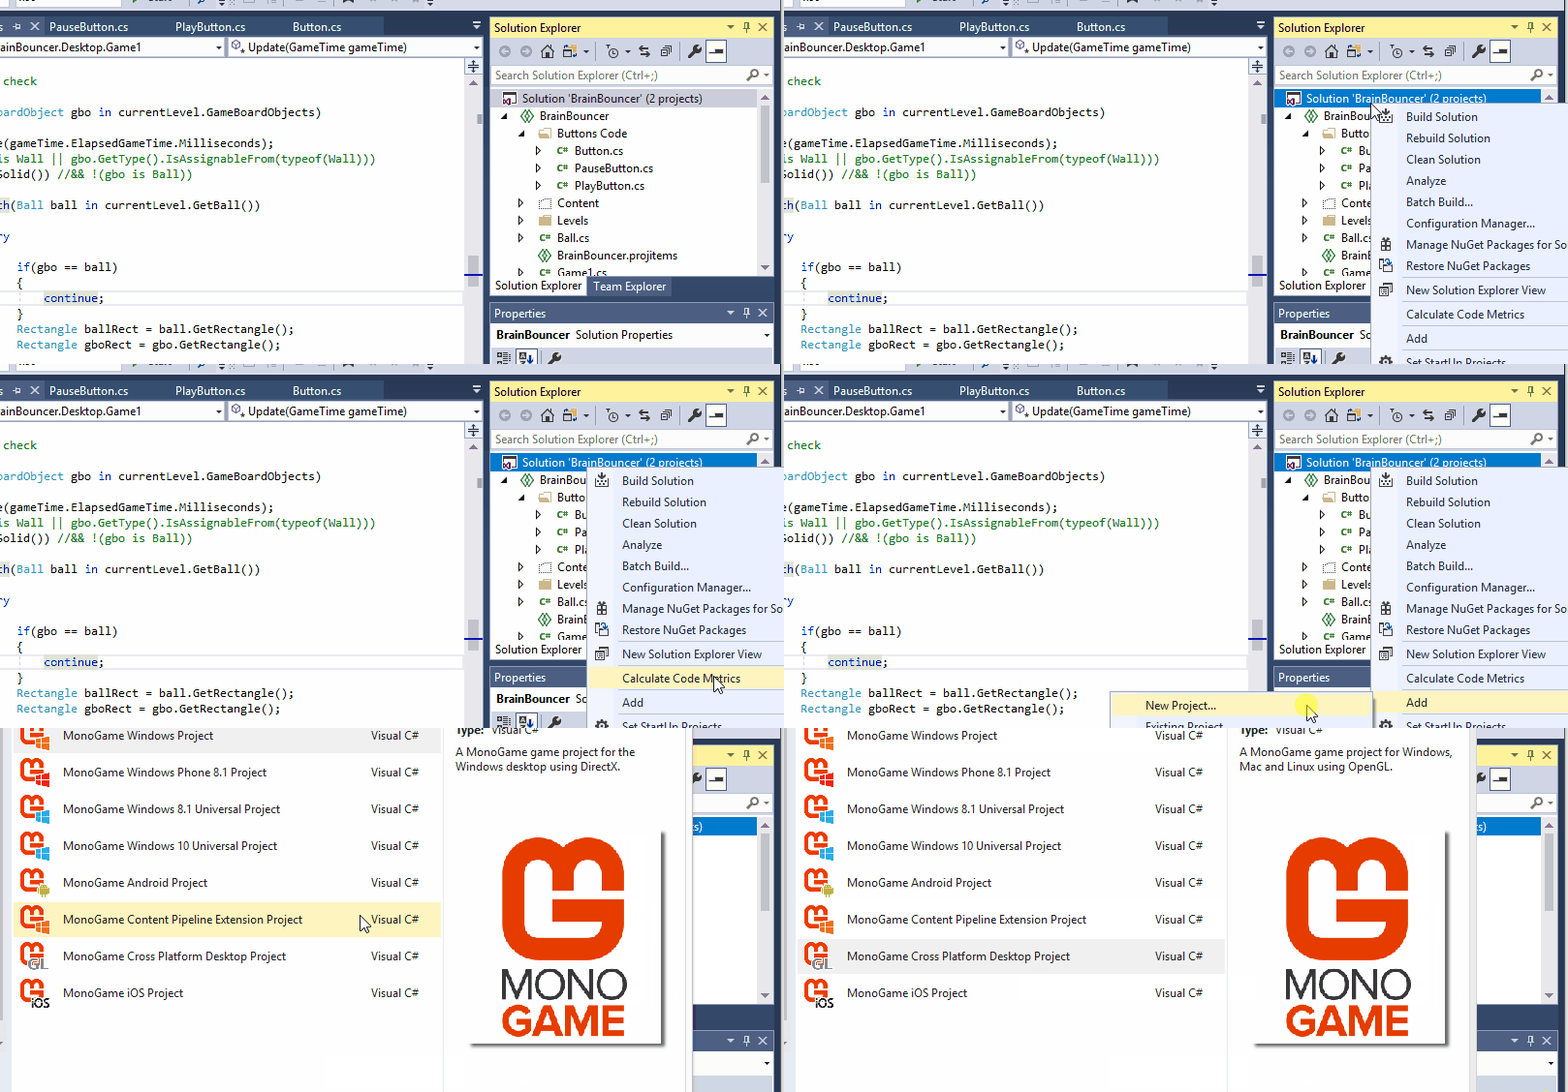
You can see in the last bit of the screenshot that there are other project options, in addition to the cross platform desktop option. So you could choose to add Android, iOS, Windows Universal, or whatever else you want.
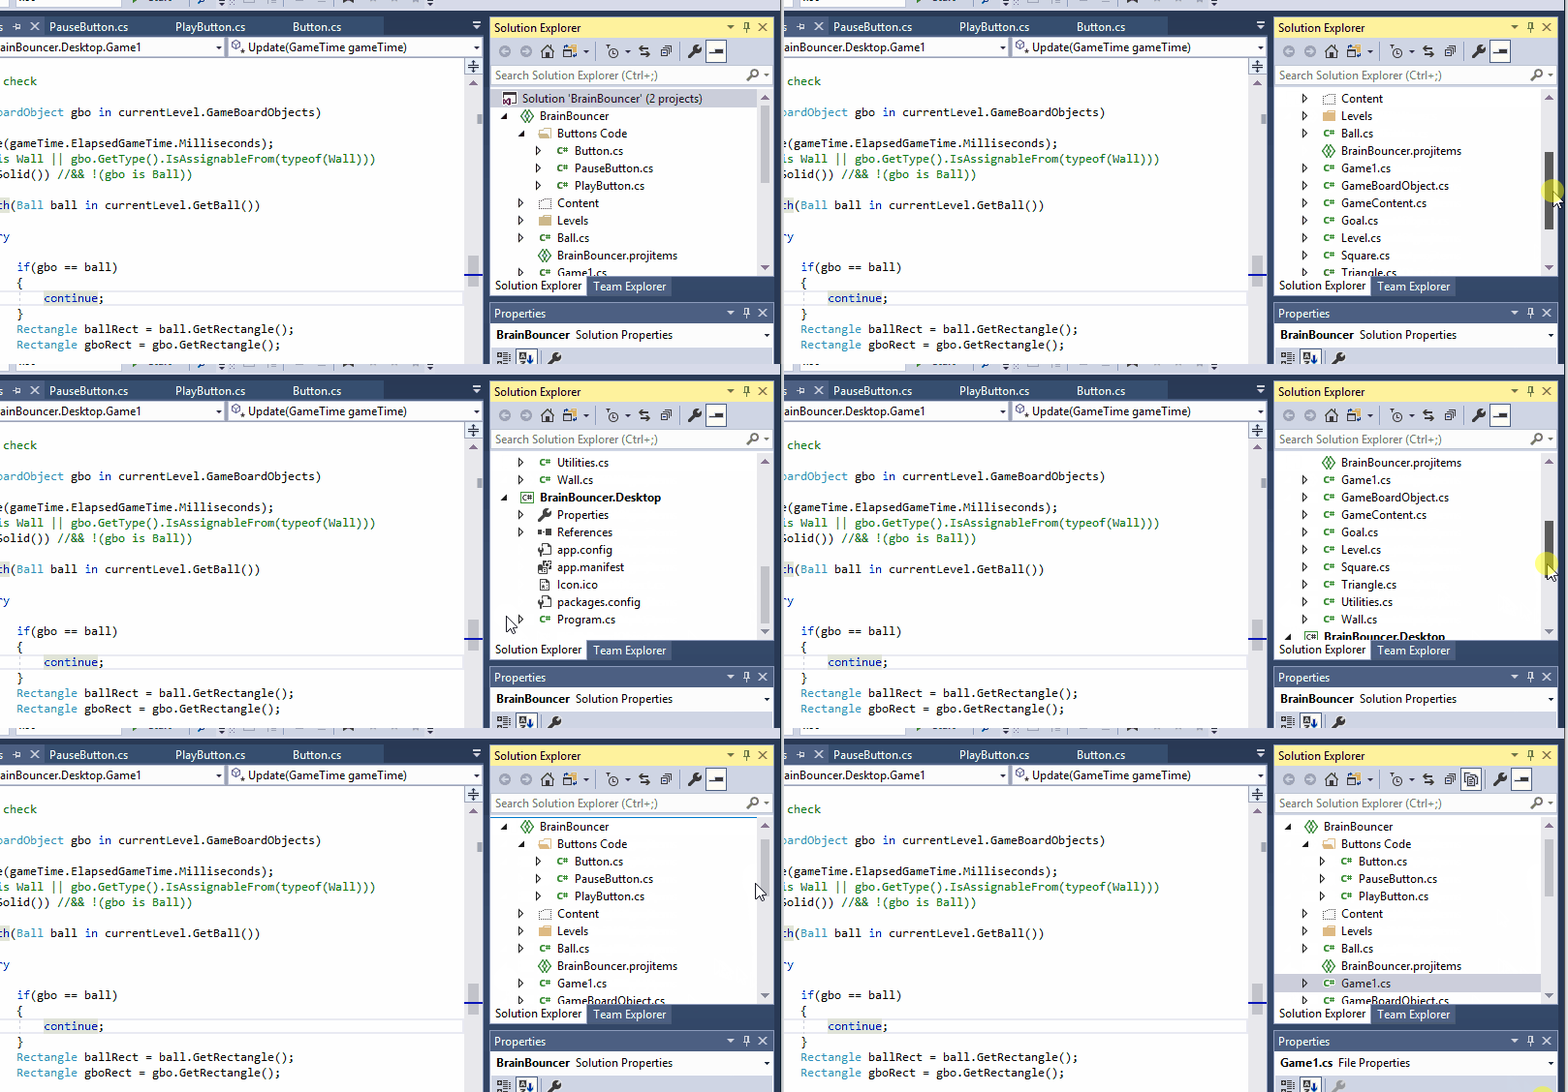
So when I created the Desktop Project, Visual Studio added a Game1.cs file to that project, as expected. But I don't want to have to recreate that code for all platforms, so I moved it to the from the Desktop Project to the SharedProject (all you have to do is right-click on the file under the Solution Explorer, and cut it from the Desktop Project, and then paste it under the Shared Project.
But now, I need to add a reference to the shared project, from my Desktop Project, so that it can access Game1.cs and any other code that I add. So in the Solution Explorer, under the Desktop Project, I right-clicked the References tab and added the reference to the shared project.
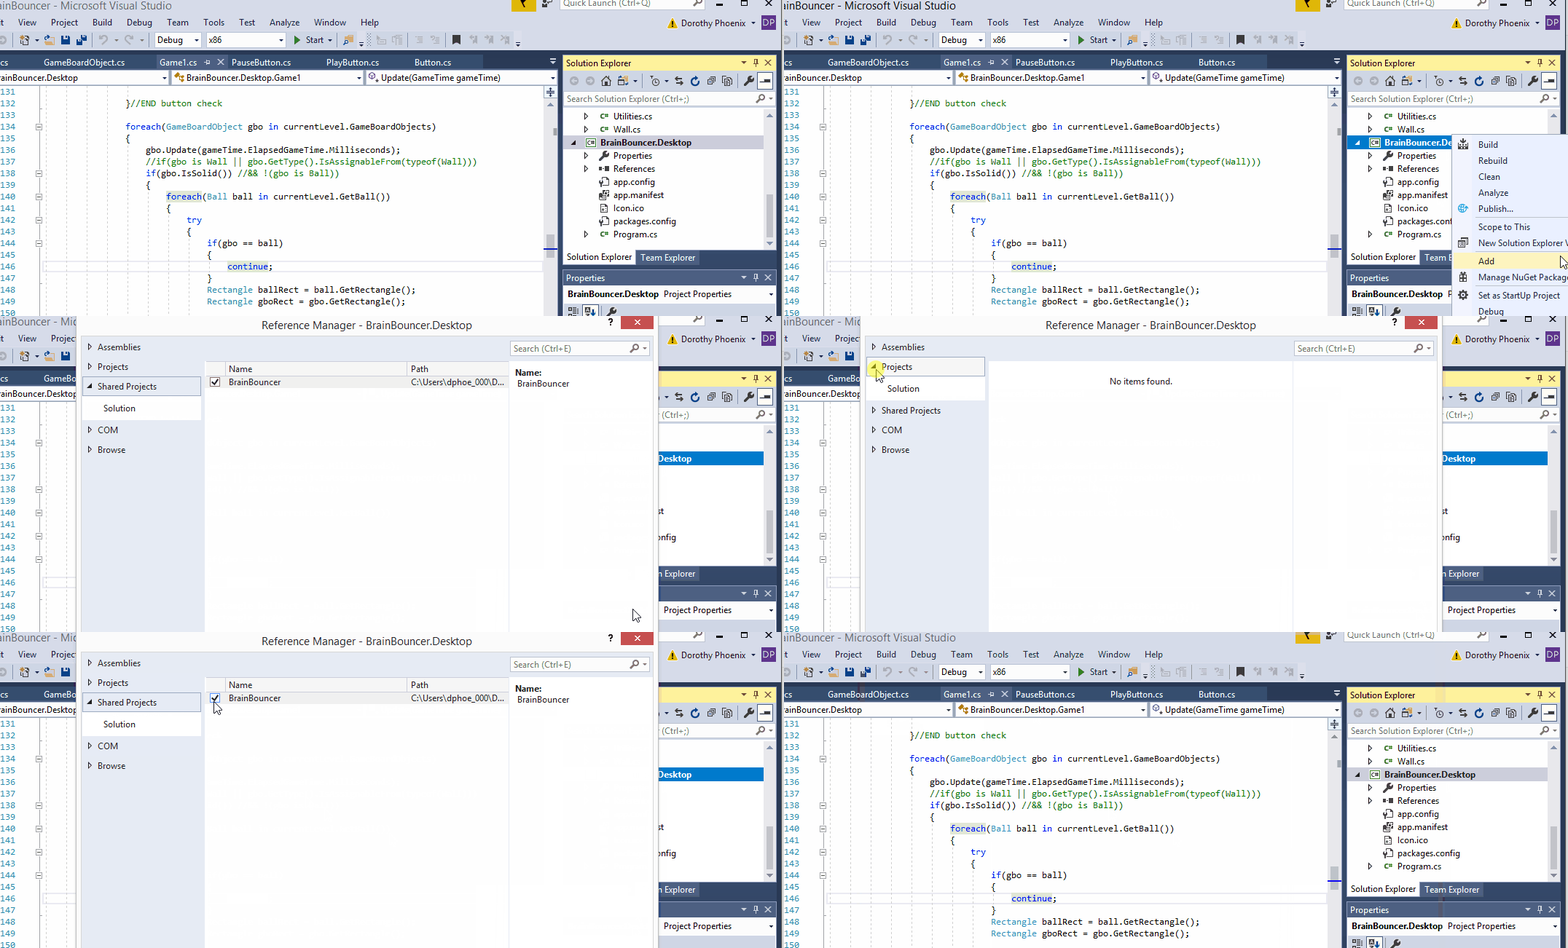
Make sure that you click the "OK" button after you tick the checkbox for the Shared Project you want to reference. I will repeat this step once I add the Android project to my solution as well.
After I did that step, I needed to make sure that my project would run so far with the shared reference. I pressed F5, and just as I hoped, the game ran. At that time, it was only a cornflower blue screen, because I hadn't added any new code by then, but that was fine, because I just needed to make sure that everything was working so far.
Sharing Content
In
addition to our code, we also want to make sure that the game's
content, such as our sprites, backgrounds, and sounds, are all part
of the shared project. In accordance with the MonkeyTap tutorial I linked to,
then, I cut and pasted the Content folder from the Desktop project to
the shared project. If you're not familiar with how MonoGame handles game content, I'd suggest you read through this great tutorial and explanation by RB Whitaker: http://rbwhitaker.wikidot.com/monogame-managing-content.
At this
point, in order to make sure the Content tool was accessible to the
Desktop project, I had to do a bit of research outside of the
tutorial to get the shared reference to work. Here's the helpful tip
I came across:
https://blog.mattjustice.com/2016/05/31/monogame-and-shared-projects/.
Per the blog post, we will need to make some changes to a couple of project settings. The first step involves moving the Content.mcgb file in the Solution Explorer to the shared project. I had already done this step by copying and pasting the Content folder (you can see a screenshot of the original location and file structure of the Content folder in RB Whitaker's tutorial that I linked to above) . The next step I had to do, in accordance with Matt Justice's post, was to modify my .projitems file.
I needed to find the .projitems file and modify it with a text editor. I didn't see it in the Solution Explorer in Visual Studio, but I looked in the Windows file directory and found it in the project folder. If you're having trouble finding it for your game project, on your computer, go to the folder where you created the project, then do a search for yourFileName.projitems. So since my project is called BrainBouncer, the filename for my project is BrainBouncer.projitems. Here's where I found it on my file system:
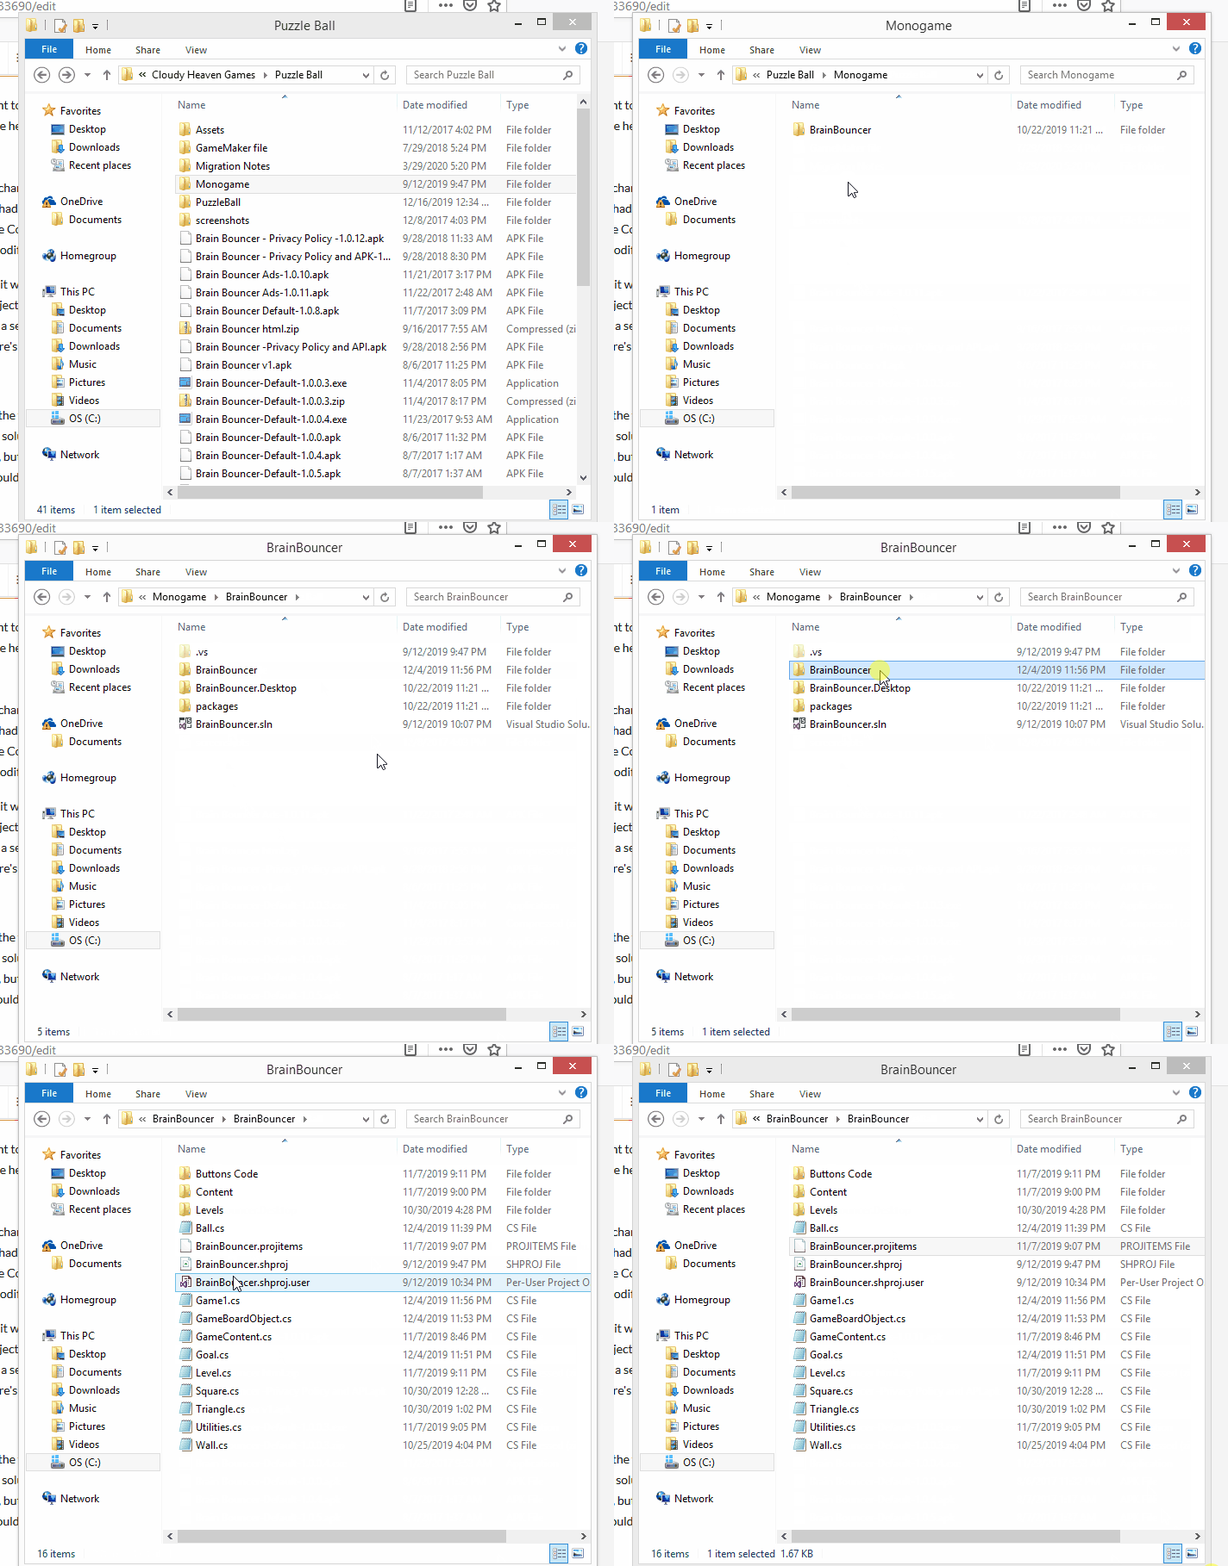
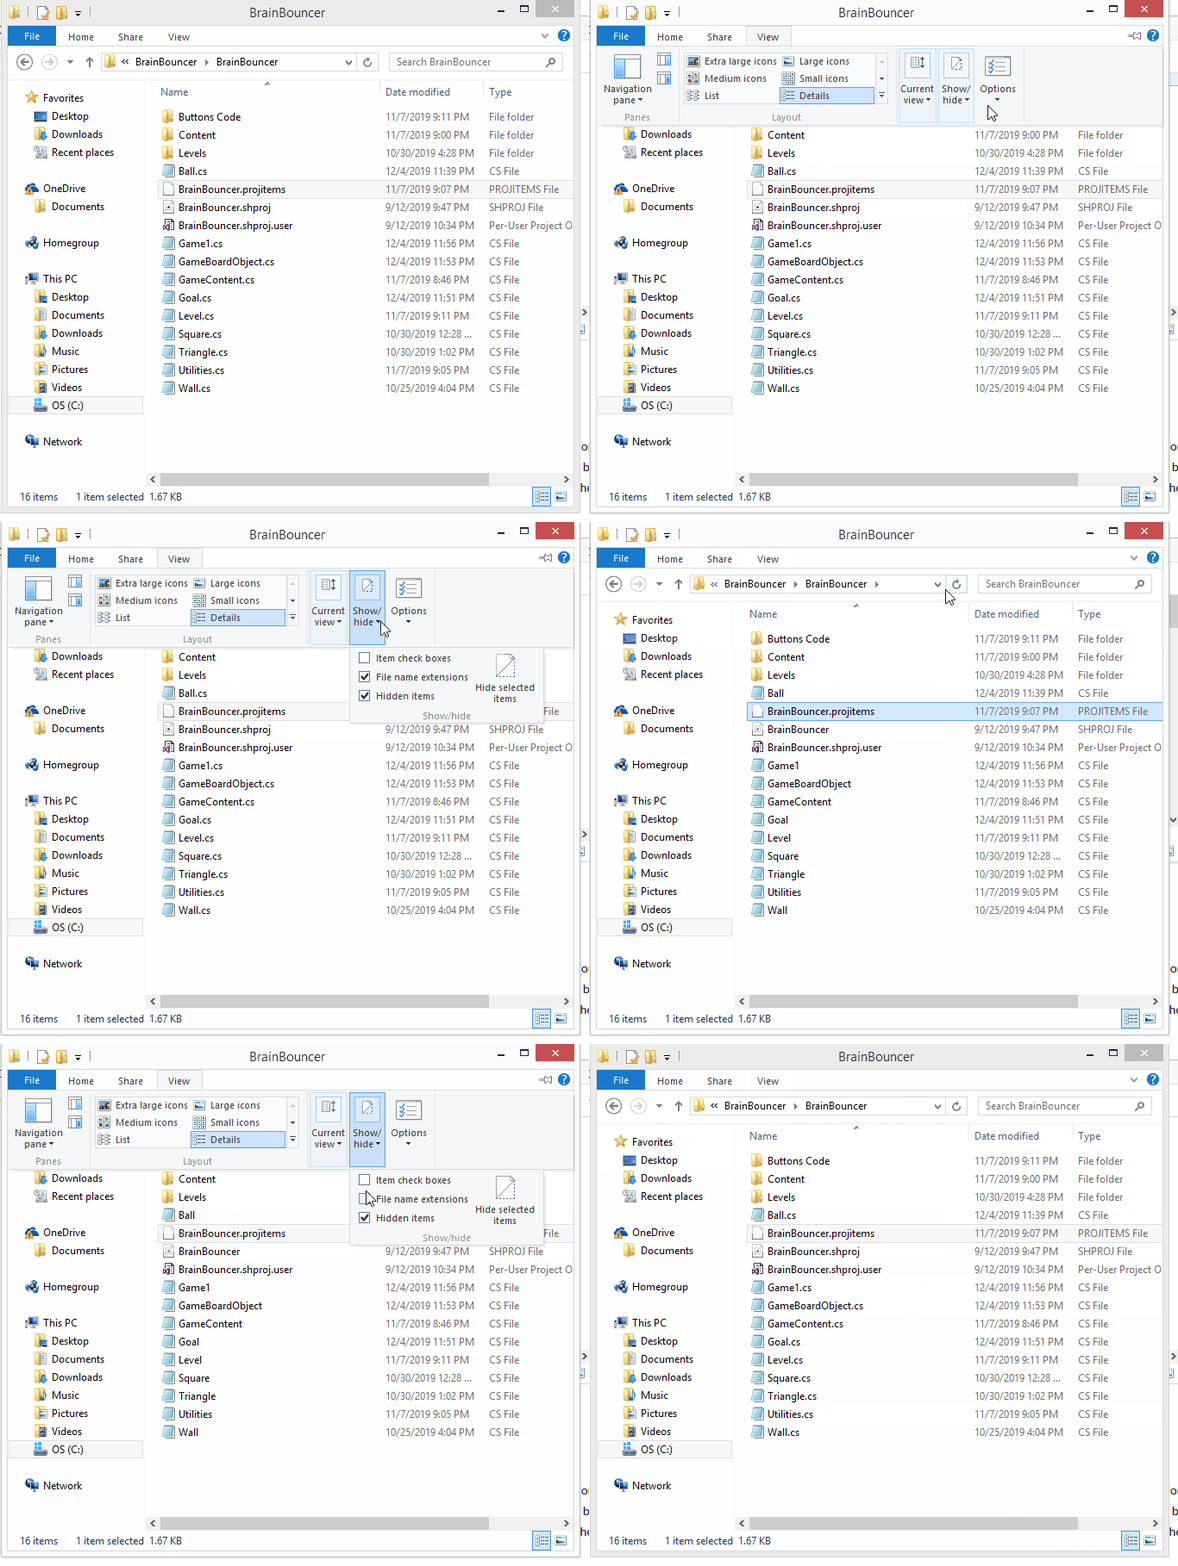
Make sure that your system is set up to show the file extensions for the filenames, as projitems is the file extension. On Windows you should be able to change it in the folder view options, similar to what I've done in the screenshot below (it will probably be different if you are not using Windows 8.1, but whatever operating system you're using, a quick Google or Help search should get you the info you need):
Before you open the file and change it, go to the shared
project in your Solution Explorer, and highlight the Content.mgcb
item. In the Properties panel, change the Build action to "None." It might already be set, but just change it to something else, then
change it back to "None" and then save the entire solution
in Visual Studio.
Now that change should trigger a line to show up in the projitems text file, like the one I've highlighted in the image below:
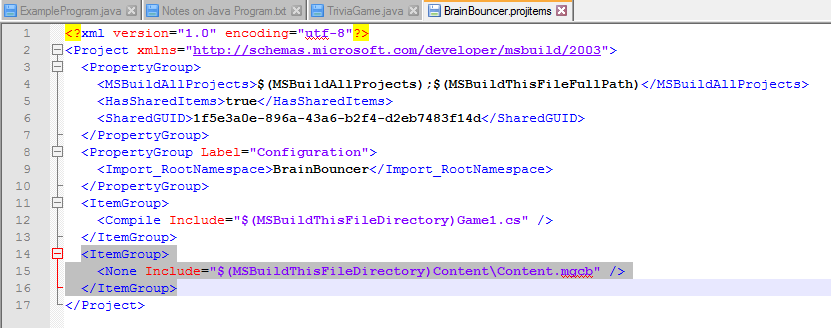
So in
that middle highlighted line, I changed "None" to
"MonoGameContentReference" as instructed in Matthew
Justice's tip, so that the line said <MonoGameContentReference Include="$(MSBuildThisFileDirectory)Content\Content.mgcb" />
From there, I was able to open the Content.mcgb file (you can click on it using your file explorer on your desktop, or you can follow the other tip in that blog post and choose the "Show All Files" button, and then click on the Content file from within Visual Studio). I then added some content to the game to make sure it loads properly. I added the background music and had it play when the game runs.
So that's the process of how I got started with creating the shared project. It was important for me to make sure that the shared project reference worked for the code and the content. It took me some time and research to get things working on my setup, so hopefully if you're doing a similar project and having problems, this post provided some help. And of course, if you're using a more recent setup, make sure you're looking at the MonoGame and Visual Studio forums and documentation for getting set up. Please let me know if you have any questions.
Next time I will be talking about migrating content (backgrounds, sprites, level layouts, and so on) from GameMaker Studio to MonoGame. The level data was originally created and stored within GameMaker Studio itself, so I didn't have any level data files that I could transfer to a new platform...so rather than go through and recreate all the levels by hand, I found a way to do it with a GameMaker Language (GML) script. I'll share more about that next time.
Get Brain Bouncer
Brain Bouncer
A bouncy puzzle game that will have you considering all angles.
| Status | In development |
| Author | cloudyheavengames |
| Genre | Puzzle |
| Tags | 2D, Physics |
| Languages | English |
More posts
- Saving the Level Data and Reloading from a FileNov 16, 2020
- Using Maps/Dictionaries to Score Game Level ScoresNov 07, 2020
- Converting and Loading Levels from GameMaker Studio with JSONOct 23, 2020
- Adding and Organizing Content in MonoGameApr 11, 2020
- Adding Source Control in Visual StudioApr 03, 2020
- Migrating from GameMaker Studio to MonoGameSep 17, 2019
- New features, and available on Google Play!Nov 23, 2017
Leave a comment
Log in with itch.io to leave a comment.